
Necklace drawer box.
Considered inside out.
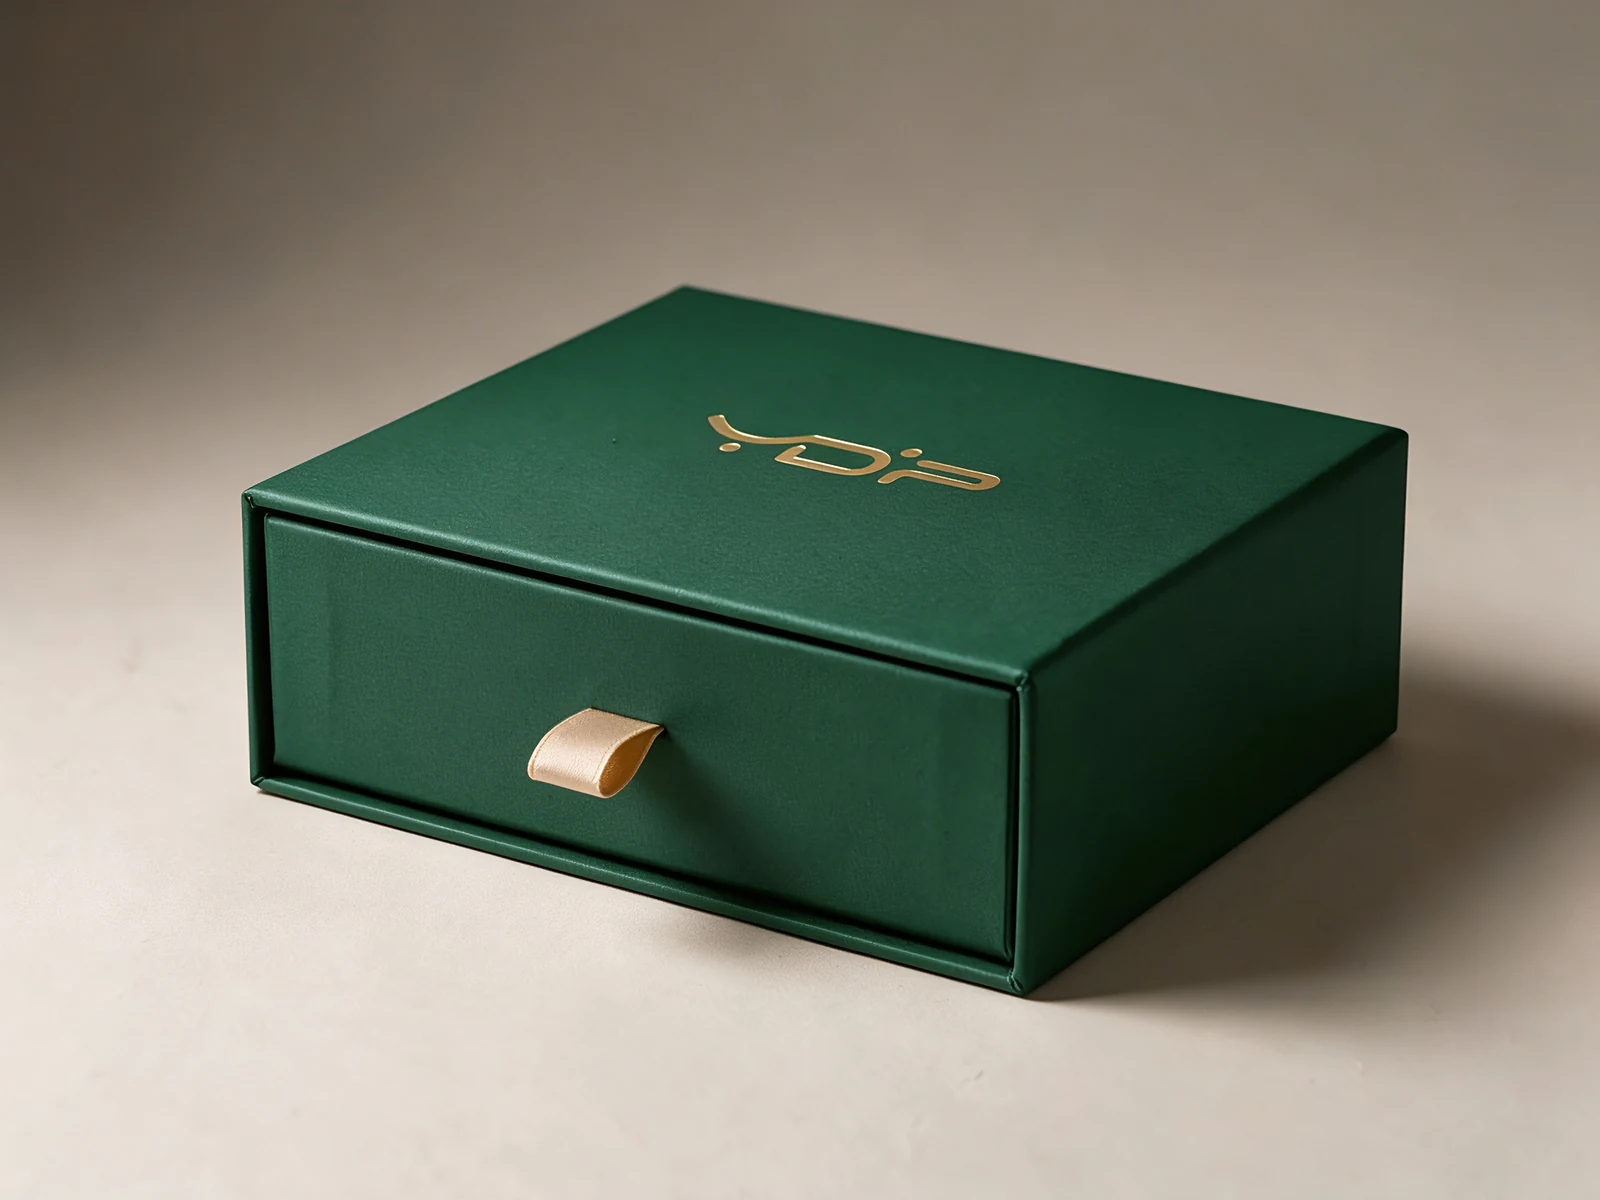
One pendant necklace, a ribbon-pull drawer and a removable ivory carrier.
Minimum order: 500 pieces. Start with a photo or a short request.
The starting direction
- Box
- Rigid sleeve & sliding drawer
- Wrap
- Matte forest-green paper
- Branding
- Champagne-gold foil logo
- Opening
- Short ribbon pull
- Carrier
- Ivory-faced board; slots & notch
- Support
- Two paperboard side supports
PACKAGINGFit, materials and finish require physical sample approval.
Explore this case 6 sections
A ribbon-pull drawer.
A gradual reveal.
The ribbon identifies where to pull; the ivory carrier sets the gold necklace against the green box.
Match the sleeve and drawer in a loaded sample. The drawer should slide comfortably without unintended movement.
Compare rigid box structures ↗︎Compare drawer and lift-off boxes Which opening fits your project?
Drawer box
Choose it for: a ribbon-led reveal and a sleeve that frames the necklace as it opens.
Plan for: forward opening space, ribbon attachment and a smooth sleeve-to-drawer fit.
Lift-off rigid box
Choose it for: direct access from above when customers or staff want the full display exposed at once.
Plan for: somewhere to place the separate lid, a comfortable lid fit and the same product-specific insert checks.
Compare quotes using the same necklace, finish, insert scope and quantity. Neither structure is automatically the lower-cost choice.
Help me choose the opening ↗︎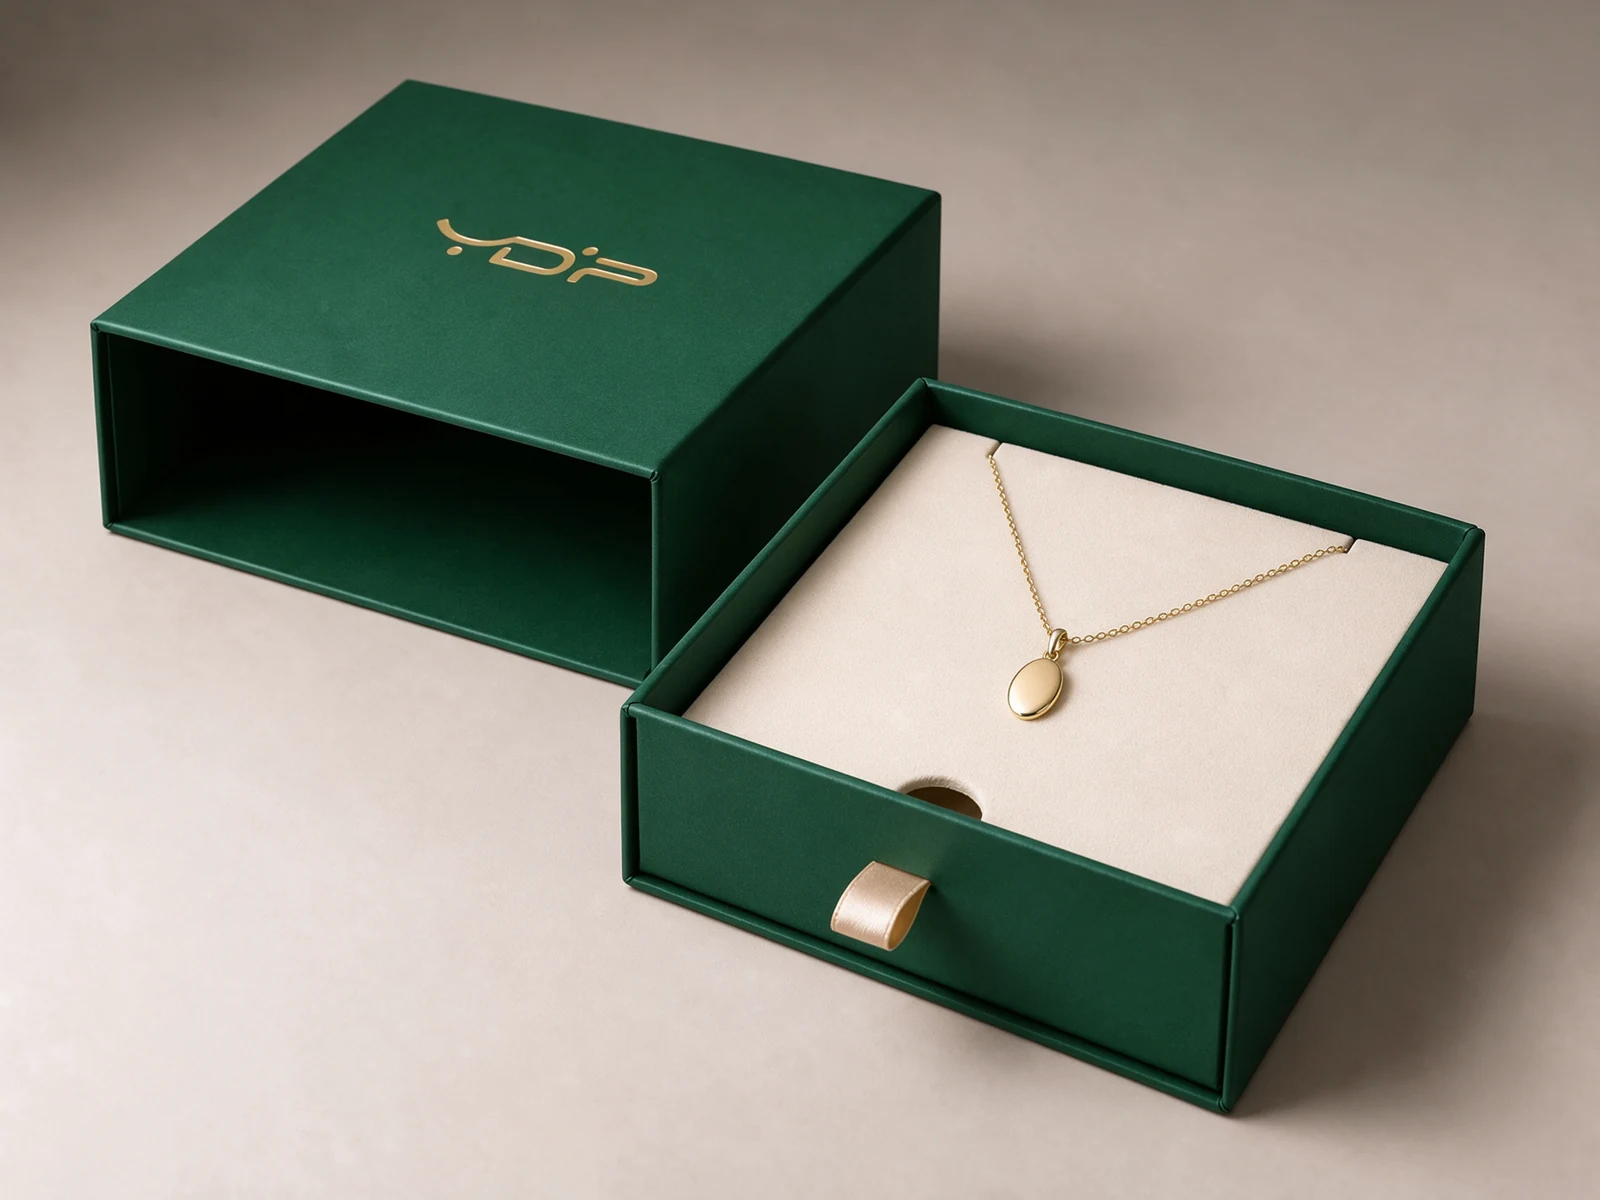
Chain routing.
Space for the pendant.
- 01
Set the chain route.
Position two slots for the necklace drape. Agree a reverse-side retaining method; empty space underneath cannot secure the chain.
- 02
Give the pendant its own space.
Keep the pendant clear of the notch and walls. Its shape and weight may call for a locating feature.
- 03
Lift the carrier, not the chain.
Use the front notch to lift the carrier, then release the chain without dragging the pendant over an edge.
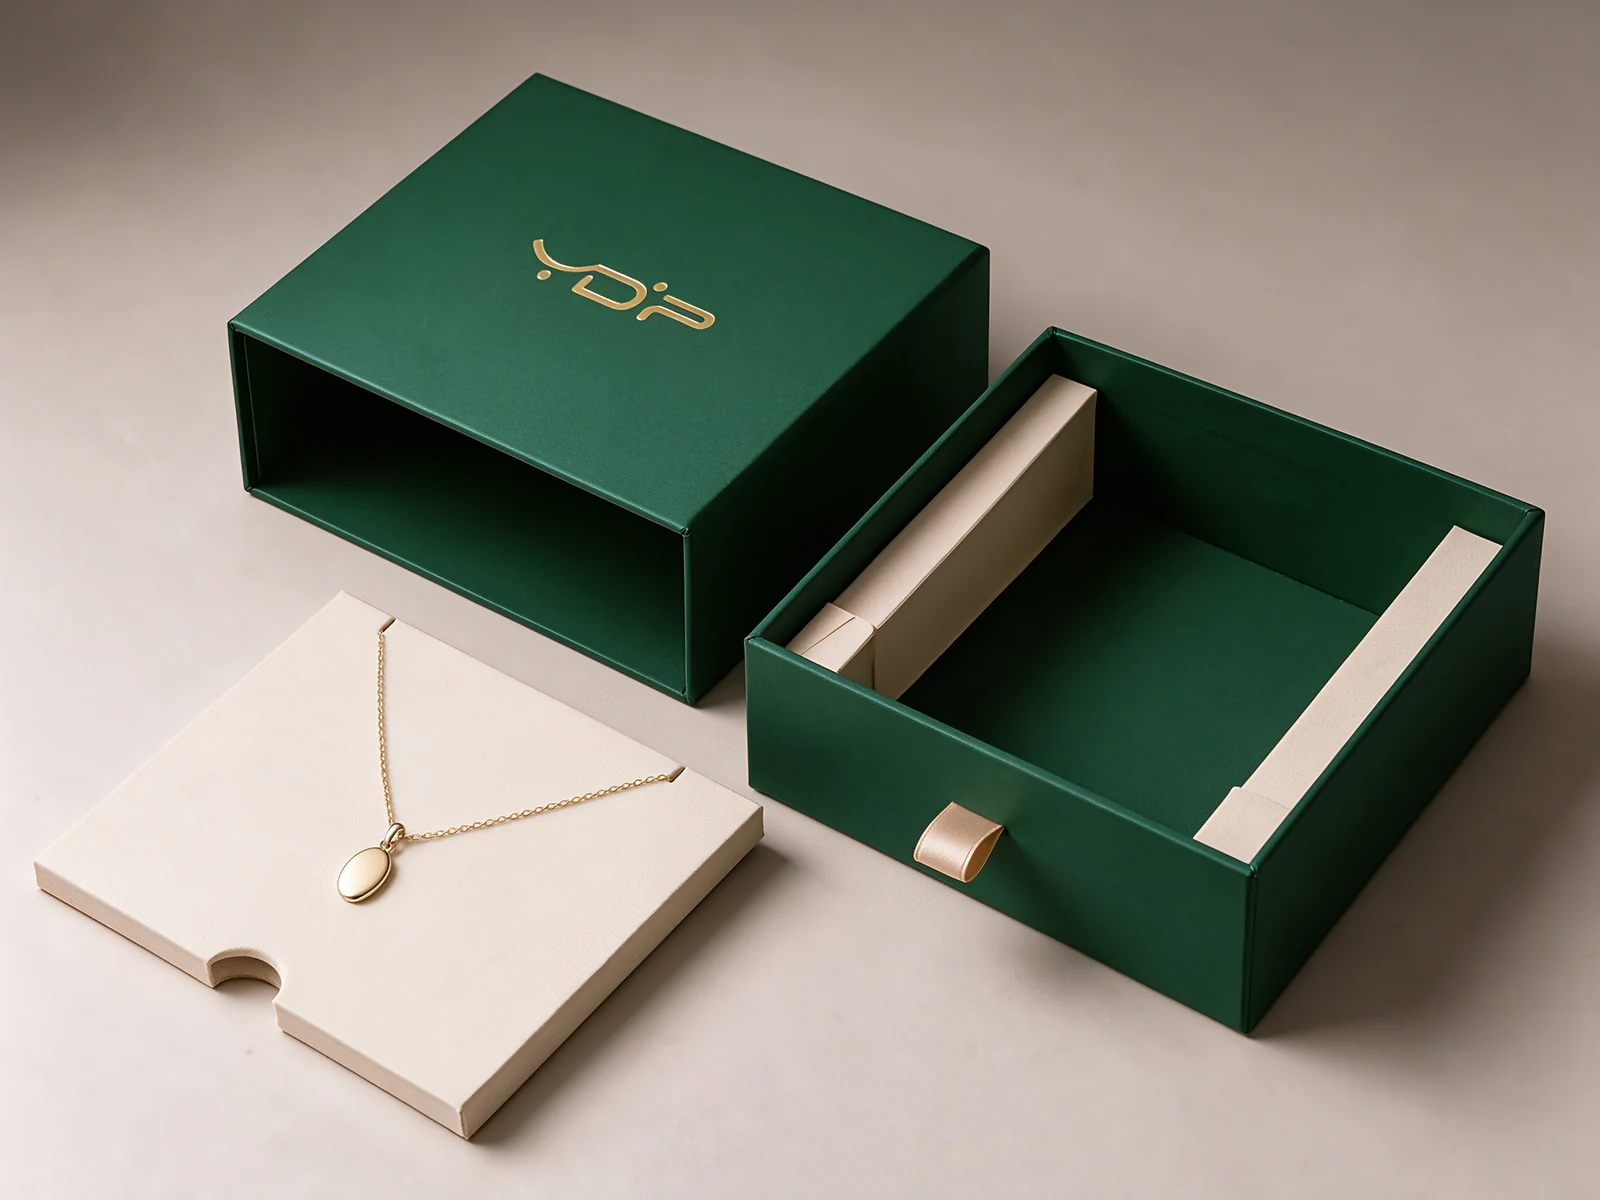
A removable carrier.
Two side supports.
Trial a stiff carrier on two folded paperboard supports. Route and secure the chain behind the carrier before seating it in the drawer.
Allow room for the clasp and chain. Check level seating, sliding clearance and the facing material’s compatibility with the jewelry finish.
Discuss my carrier layout ↗︎Materials, dimensions
and brand options.
Size the carrier around the necklace, then develop the drawer and sleeve together. Supplied assembled; confirm board, paper and foil on a sample.
Component specification & sample checks Six parts to review
| Component | Starting direction | Confirm before production |
|---|---|---|
| Sleeve & drawer | Wrapped rigid paperboard construction with a front ribbon pull; supplied assembled. | Board thickness, internal dimensions, sliding clearance, ribbon anchoring and drawer alignment with the loaded insert. |
| Outer wrap | Forest-green paper with a fine, matte texture. | Paper grade, physical colour reference, corner wrapping and rubbing at the sleeve opening. Approve wrap and board together. |
| Brand finish | A small champagne-gold foil logo on the sleeve top. | Foil colour, edge definition and adhesion on the selected stock. Check the artwork against the original logo file. |
| Display carrier | Ivory-faced stiff board with two chain slots and a front finger notch. | Slot edges, necklace drape, pendant contact, reverse-side retention and a comfortable loaded lift. |
| Carrier supports | Two folded paperboard side supports as the first construction to trial. | Attachment, height, carrier seating and clearance for the chain and clasp. Revise if the carrier bends or tips. |
| Contact layer & delivery | A smooth contact surface to evaluate with the actual piece, plus separate outer transit packaging. | Material compatibility, any required protective treatment and handling checks for the complete packed shipment. |
Budget priorities: settle the carrier, sliding fit and contact surface first. Dimensions, paper, foil tooling, insert complexity and quantity shape the quote.
What can change for your brand?Colours, dimensions and insert layout
Colours & branding
Choose wrap, logo, foil and ribbon. Approve them together on the selected paper.
Box dimensions
A larger pendant or clasp can change carrier height, drawer depth and sleeve size. Review the complete assembly.
Insert layout
Adapt slots, locating features and contact material to the piece. Earrings and sets need a different retention layout.
From fit sample
to production approval.
Agree sample options, costs, production and delivery timing with sales. Review the complete necklace and intended packing method.
What will the sample review check?Loaded fit, contact surfaces and the complete pack
- 01 / FIT & PACKING
Pack the complete necklace.
Confirm the loaded layout and chain retention, then record dimensions, slot positions and packing instructions.
- 02 / USE & CONTACT
Open, lift and release.
Trial opening, carrier removal and necklace release. Inspect contact points, ribbon attachment and wrap wear; record any changes.
- 03 / FINISH & DELIVERY
Approve the complete pack.
Approve the materials and artwork together. Agree transit packing and handling checks, then retain the approved sample and production scope.
Choose your next packaging decision.
Explore jewelry packaging ↗︎
Choose a box around your piece, its presentation and removal.
Plan necklace support ↗︎
Review chain routing, the pendant position and access to the carrier.
Prepare a comparable quotation ↗︎
Describe the box, insert, quantity and delivery scope for your project.
Beyond necklaces.
Reuse the opening and branding; adapt the carrier to each product.
Earrings & sets
Use dedicated retainers, allow space for posts and backs, and separate pieces that could touch.
Bracelets & accessories
Review a band, cradle or shaped support. Adjust the carrier and drawer height to the item.
Medals & keepsakes
Adapt the support area for weight and ribbons, then trial the loaded drawer.