
Reviewing a necklace box insert
A necklace insert should show the piece clearly, keep the chain and pendant in their intended positions, and let the customer remove them without pulling against the packaging. Review that full sequence before approving the insert.
A photo of the necklace and the presentation you want is enough to start. Share measurements where available; the cut layout and contact material can be developed around the actual piece.
Discuss my necklace packaging ↗︎Record the whole necklace
- Chain: total length, thickness or link width, flexibility, and any extension chain.
- Pendant: width, height and depth, including the loop that connects it to the chain; note weight if known.
- Clasp: size, opening method and where it will sit when packed.
- Contact surfaces: metal finish or plating, stones, pearls, coatings and any care requirements supplied by your jewelry team.
Label units and show the front, back and clasp in photos. For multiple necklace sizes or pendant shapes, keep a separate record for each version. A layout that works for one chain does not establish fit for the whole range.
Follow the chain, pendant and removal path
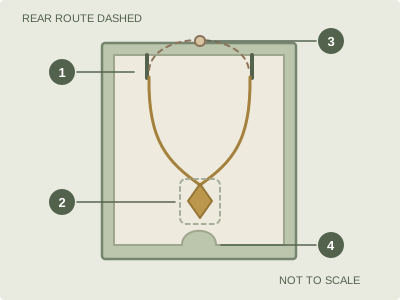
- 1 / Chain locating points
- Show the entry points and loading sequence. Check whether the chain catches on cut edges or is held under tension. Slot size and edge finish should be reviewed with the intended chain rather than selected from a generic drawing.
- 2 / Pendant position
- Locate the pendant so the intended face is visible. Review depth and nearby surfaces, including the closed lid. Check whether it turns, lifts or contacts another part of the jewelry during normal handling.
- 3 / Clasp & spare chain
- Give the clasp and extra chain a defined route or compartment. If they pass behind the insert, inspect that area after loading and closing. Keep loose metal components from resting against sensitive surfaces and confirm how they will be released.
- 4 / Removal access
- Try the intended removal sequence by hand. If the insert lifts out, provide a usable notch or pull feature. Release the chain from its locating points before lifting the necklace; review whether the customer can find that sequence easily.
Review the contact layer as well as the support
The insert directory includes paperboard, foam-based and flocked directions. Specify the support beneath the visible lining, the contact surface and how the layers are attached. Review cut edges, lint or shedding, adhesive exposure and any visible marks after loading and removal.
Identify the actual jewelry materials when selecting the contact layer. GIA’s jewelry-care guidance highlights scratch-sensitive materials and the importance of appropriate storage. A soft-looking lining alone does not establish compatibility, scratch protection or anti-tarnish performance. If long-term storage or tarnish control matters, include that requirement and ask what evidence covers the proposed material.
Make a repeatable sample check
- Identify the versions: necklace, insert, lining and box; photograph the packed front and any chain routed behind.
- Load and close: follow the intended packing steps and check the clasp, pendant and spare chain positions with the lid shut.
- Open and remove: check alignment, visible movement, catches and surface marks. Record the removal steps and any difficulty.
- Record a decision: approved observations, changes and unresolved checks, with a date and reviewer.
A demonstration of fit and removal is one approval step. For a shipped product, review the complete jewelry-and-package arrangement, including the outer transport pack, against the intended route. Agree the transport checks separately; a hand-held movement check is not a shipping-test result.
Send a short insert brief
- Piece: front/back photos, chain length, pendant and clasp dimensions with units, and known surface-care requirements.
- Presentation: box reference, displayed position, single piece or set, and proposed spare-chain route.
- Use: loading owner, desired removal method, retail display, gift presentation or shipping route.
- Order: quantity by product version and artwork, destination and target arrival.
- Review: existing sample observations and any storage, contact-material or testing requirements.
Download the necklace insert review worksheet (TXT) ↓
No email needed. Record what you know and copy useful details into your inquiry. Reference photos or a PDF can be attached.
Start with custom jewelry packaging for the complete project. This guide focuses on necklaces; rings, earrings and mixed sets need their own locating and removal review. YDP’s minimum order quantity is 500 pieces, with the size and design breakdown reviewed for your quotation.
Send my necklace and insert questions ↗︎