
Choosing support for a candle jar
A candle jar needs more than an opening it can fit through. Plan the support around the complete vessel, its filled weight, the surfaces it touches and how someone will lift it out.
Start with a product photo, approximate quantity and the measurements you have. If the support material or box style is still open, we can review the packaging direction with you.
Discuss my candle jar and packaging ↗︎Measure the complete, filled vessel
Measure the jar as it will be packed, including the lid, label and any protruding detail. Record maximum width and overall height with units, plus the filled weight including the lid. Net wax weight alone does not describe the load the packaging will hold.
- Shape: show the widest point, base, shoulder and lid. For an oval or irregular vessel, record both width directions and a drawing or labelled photos.
- Surface: identify glass, ceramic, metal or another vessel material, with any coating, label or decorative finish that needs a contact review.
- Orientation: describe the intended presentation and loading direction. Show whether the lid stays fitted or has a separate position.
- Variants: list each vessel size and weight separately; record measurement ranges if your samples differ.
Product measurements are the starting point. Finished inside-box dimensions also depend on the insert, closure and removal space. For a cylindrical presentation pack, the paper tube dimensions guide explains inside diameter and usable height.
Review three places around the jar
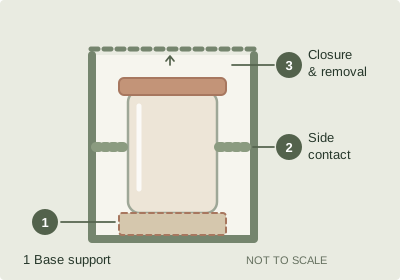
- 1 / Base support
- Show where the filled vessel sits and how the proposed support meets the box base. Review the assembled sample for seating, deformation and loose components. A locating ring alone does not establish adequate weight support.
- 2 / Side contact
- Identify where the insert contacts the jar and how it limits movement. Check the label and finish after loading and removal. Avoid treating a tighter opening as an automatic improvement: it may make loading difficult or mark the surface.
- 3 / Closure & removal
- Check that the box closes fully with the complete jar inside. Provide a practical grip or removal method and try it with the intended product. Do not assume a decorative jar lid can safely carry the vessel’s weight during removal.
Choose the support before fixing its material
Use the insert directory to compare available directions, then describe the job the insert must do. Ask where it contacts the vessel, how it is held in the box and how the packing team will assemble it. Paper, corrugated and foam-based options need review in their proposed construction and grade.
If you want an all-paper direction, identify the complete scope, including lining, adhesive and accessories, for review. Appearance or a material name alone does not establish recyclability or protective performance. Any environmental claim should refer to the confirmed specification and the relevant disposal route.
Review the presentation pack and the shipment
State whether the jar will go to a retail shelf, travel as part of a gift set, or ship individually to a customer. Describe the filled product shipment as well as the delivery of empty packaging. These stages can need different packing arrangements.
A fit sample helps check loading, contact, closure and removal. For shipping performance, review the complete filled product with its proposed presentation pack, cushioning, outer carton and closure. Select the test plan for the actual distribution route and agree damage acceptance criteria before testing. A fit check alone cannot establish that a glass or ceramic jar will arrive intact.
ISTA’s design and testing guidance explains why the distribution environment and representative product-and-package samples matter. Ask who will arrange the relevant testing and keep the test report tied to the vessel and packaging revisions it covers.
Keep a short sample review record
- Identify: vessel version, filled weight, insert version, box version and sample date.
- Observe: loading, seating, closure, hand removal and visible surface marks; attach photos of any issue.
- Decide: approved observations, changes to make and checks still outstanding. Record fit, appearance and transport results separately.
- Revisit changes: if the vessel, weight, insert, outer carton or shipping route changes, review which approvals and tests need repeating.
Send the details you have
- Vessel: photo or drawing, maximum dimensions with units, filled weight and surface finish.
- Packaging: preferred tube or box, opening direction, single jar or set, and any insert reference.
- Handling: who packs the jar, how it should be removed, and any known contact or closure problem.
- Order: quantity by vessel size and artwork, destination and target arrival.
- Checks: existing sample observations, intended shipping route and any customer test requirements.
Download the candle jar fit worksheet (TXT) ↓
No email needed. Fill in what you know, then copy useful details into the inquiry. Reference photos or a PDF can be attached.
Explore custom candle packaging for the vessel and project scope, or paper tube packaging if the cylindrical direction is already clear. YDP’s minimum order quantity is 500 pieces; quantities by size and artwork will be reviewed for your quotation.
Send my jar details and fit questions ↗︎