
Paper tube dimensions: a product-fit guide
Inside diameter decides whether the product can enter. Usable internal height decides whether it can sit under the closed lid. Outside dimensions describe the finished pack. Keep these measurements separate when briefing a custom paper tube.
Start with the product you will pack
Measure the complete item as supplied: cap, label, pouch or inner wrap included. For a bottle or jar, record its widest point and total height. For a non-round item, send width × depth × height and a photo showing the shape; width alone does not establish whether it fits a circular opening.
Include filled weight, intended orientation and any surface that should not rub against the pack. If you have several products, identify each one separately. These are product measurements, not final tube dimensions.
Four measurements, two different jobs
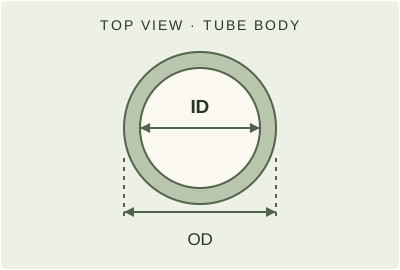
ID & OD
Measure the same component and label the result.
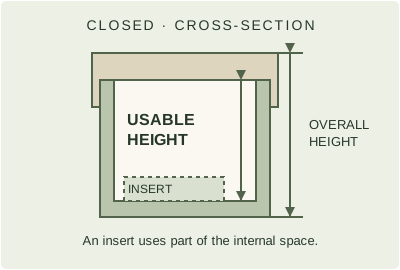
Usable & overall height
The closed pack is taller than its clear interior.
- Inside diameter / ID
- The clear diameter inside the tube body. Show the opening and any narrower sleeve or lip the product must pass through.
- Outside diameter / OD
- The diameter across the outside of a named component. A lid or sleeve may be wider than the body; identify the widest part of the finished pack too.
- Usable internal height
- The space from the inside floor to the underside of the closed lid in the agreed construction. An insert or raised support uses some of this space.
- Closed overall height
- The full external height with the lid closed and base fitted. Use the finished external dimensions when reviewing storage and packing.
For a plain cylinder with a uniform wall, outside diameter equals inside diameter plus twice the wall thickness. This geometric relationship does not establish the finished size of a pack with a separate lid, sleeve or added covering. Label the actual component you measured.
Already have a tube? Show what each number means
Mark ID, OD, usable internal height and closed overall height on photos or a drawing, with mm or inches. For the inside opening, record measurements in two perpendicular directions rather than hiding a difference in one average. Note the lid type and whether an insert was fitted when you measured.
A ruler or tape can support an initial discussion; a suitable caliper can give a clearer diameter reading. Tell us how you measured. A measurement of one existing pack is a reference, not an agreed production tolerance.
Leave room for fit, opening and removal
A product that enters the tube may still be difficult to remove or sit too high under the lid. Check the opening path, any insert around the product, support under it and how a hand can grip it. Do not add a fixed clearance to every product: the starting dimensions should be reviewed against the construction and a fitted sample.
Review support options in the packaging insert directory. Then check loading, lid closure, movement and removal using the intended product. Fit observations do not by themselves prove shipping protection or suitability for direct contact with the contents.
Send a useful first measurement brief
- Product: photo or drawing, complete dimensions with units, filled weight and orientation.
- Existing tube, if any: labelled ID, OD, usable height and closed height; show the lid, base and insert.
- Packaging job: outer presentation pack, transport protection or direct product contact.
- Appearance: a reference photo and any known paper, print or finish preferences.
- Order: estimated quantity by size and artwork, destination and target arrival.
Unknown details can stay open. YDP produces paper tubes on its own line. Use the custom paper tube packaging page to review the product route and the tube structure and closure guide to compare the construction.